Summary:
Today we are going to show you not only how to use the Hue and Saturation adjustment to enhance your colors, but we will be showing you how to replace/change specific colors. This tutorial will go over all the details such as what is hue, saturation or even the lightness options do in the dialog box. Along the way we will even show you some excellent tips and tricks such as how to only adjust a certain portion of the whole image.
If you are unfamiliar with certain areas that are not covered in this tutorial, feel free check out other tutorials on our website. We have many different types of tutorials that can be downloaded (Video, PDF) or viewed online that will train you for free! Once you have the knowledge, feel free to come back and go through this tutorial again.
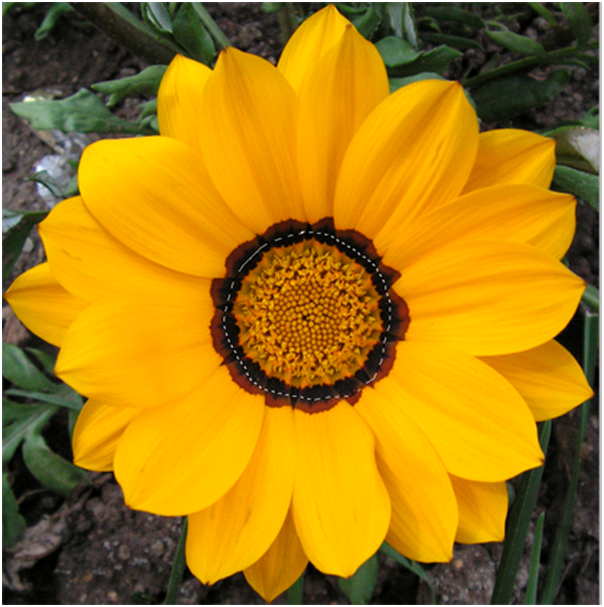
You will be using a picture of a yellow flower. If you do not have this image, please scroll down to the “Click Picture To Download Supporting Files” and download the image. Please open the image PE-YFLOWER in the Photoshop Program.
Normally we will combine multiple tools, adjustments, or features in one Photoshop tutorial. Due to the fact that we want to really get you familiar with Hue/Saturation adjustment, we will be limiting this tutorial to this one adjustment. Don’t worry, we will be showing some VERY cool features within this tool.
We just finished the Color Balance tutorial (Boosting And Enhancing Colors), which we showed you that you can change a color. The disadvantage with Color Balance is you can only adjust the shadows, midtones, highlights. What if you wanted to change the color, but only change a specific color in the image? Well that is when you turn to the Hue and Saturation adjustment.

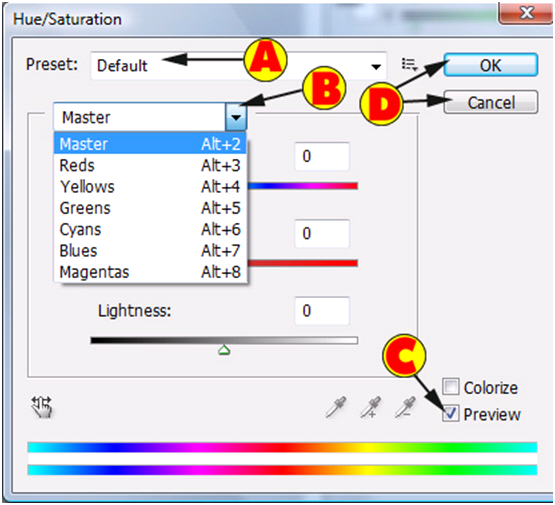
| A).
Left click the drop down box to select a preset. A preset is a
predefined Hue/Saturation setting. Example: Select, “Yellow Boost” to
make the yellows look good. | |
| B).
In this drop down menu, you are telling Photoshop what colors to select
(NOT what colors you want to change it to). If you leave this set to
“Master” than you will change all the colors of the image. **It is
important to select the correct color only or else the whole image will
look bad. What if the color is not in the list? For now, use a color
that is similar to the actual color. On this example, Left click the
drop down box and Left click the “Yellows” option. | |
| C). Make sure the “Preview” is checked off and that way you can see the changes on the actual images as you adjust the color. | |
| D). Left click the “OK” button to apply the changes or “Cancel” to disregard the changes to the adjustment. |

| A). Hue – Basically is the color. | |
| B).
Saturation – We talked about this in previous tutorials and it is how
vivid the colors look. Increase the Saturation and you will get a boost
to your colors. | |
| C). Lightness – This is how dark or light you want to make the color. | |
| D). For the Hue, Saturation, or Lightness, you have text boxes. You can enter a numeric value instead of using the slider bars. |

Hue: -12
Saturation: 20
Lightness: –2

Here is the before and after. See how easy that was? See how it only affected the yellows? Notice how the green in the background is still green and not orange. Remember, if you have the selection drop down list set to “Master” it changes ALL colors, not just the selected color.

You will find that by selecting a color does a good job, but sometimes it changes similar colors that you do not want changed. Also, maybe you only want some of the yellows changed in this example and leave some untouched. First make a selection around the object (maybe just the center area) and change the color.


Now make the exact changes in the Hue/Saturation adjustment.
Hue: -12
Saturation: 20
Lightness: –2

**Re-Open the image or use the history palette to go back to the original state of the image. Get back into the Hue and Saturation adjustment dialog box. Sometimes it is hard to determine which color to pick from the drop down box. Let Photoshop determine the color for you! This way will allow Photoshop to determine color and it will also allow you to adjust the saturation at the same time.

Sometimes you want to make the same adjustment to multiple colors. Instead of adjusting each color separately, or causing other color problems with the “Master” option, let’s add multiple colors as a selection using the eyedroppers. In the selection drop down box, Left click “Greens”.
| A). Left click this eyedropper and then Left click in the image to change the starting color. | |
| B).
Want to add more colors, Left click this eyedropper and then Left click
the color in the image. In this example, Left click the yellow area of
the image. | |
| C). Need to remove a color from the selection? Left click this eyedropper and select the color in the image. |


On this example, we only used the image of the flower. Start thinking about other uses for the Hue and Saturation adjustment tool. Need to add skin tone color to an image because the person looks to pale? What about changing the color of your car or even your eyes. Anything you want to change or enhance a color on, Hue And Saturation is the way to adjust the color.
After reading this tutorial you should now understand how to use the basic functions of the Hue and Saturation adjustment tool. As you can see, we did not go over a few areas such as the color bar at the bottom of the dialog box and we also did not talk about the colorize option. In a future tutorial, we will dedicate a full tutorial on colorizing your image.

| A). CTRL-“H”. | |
| B). CTRL-“S”. | |
| C). CTRL-“U”. | |
| D). CTRL-“Y”. |
| A). It changes the brightness of the image. | |
| B). It changes the saturation of the image. | |
| C). It changes the lightness of the image. | |
| D). It changes the color of the image. |
| A). Inverse. | |
| B). Reverse. | |
| C). Flip. | |
| D). Invert. |
| A). It allows you to select a color from the image. | |
| B). It allows you to add a selection color from the image. | |
| C). It allows you to remove a selection color from the image. | |
| D). It allows you change that specific color. |
| A). It allows you to take control of the image contrast. | |
| B). It allows you to split the color channels into primary colors. | |
| C). It allows you to change all the colors at once. | |
| D). It creates a master scale which allows you to fine tune your color selection. |
| A). It is used only to determine what color a specific pixel is on the screen. | |
| B). It allows you to stretch the colors and pixels. | |
| C). It can only be used to make a selection around the area of the image. | |
| D). It is used to have Photoshop determine the color and to change the Saturation. |
| A). It determines what color the pixel is and changes the color selection drop down to the correct color. | |
| B). This allows you to add multiple colors to the color selection dialog box. | |
| C). This allows Photoshop to sample the color and it will allow you to change the saturation. | |
| D). Use this Eyedropper to fill a specific area with a solid color. |
| A). It shows both colors such as Reds, Greens. | |
| B). It will show the word of the color and add a numeric value to the end of it. | |
| C). You will see the color name with a “+” next to it and if you Left click the “+” it will display all the selected colors. | |
| D).
It shows one color, but the text will be bolded. If you Left click the
bold text, it will display all the colors used to make the selection. |
| A). Hue. | |
| B). Saturation. | |
| C). Brightness. | |
| D). Lightness. |
| A). Use the eyedropper and select the correct petal. | |
| B). Make a selection around the one petal and then make your adjustment. | |
| C). Use the finger with the left and right arrows and select the correct petal. | |
| D). Select the 1 correct petal and then make sure you Inverse the selection before you apply the Hue and Saturation changes. |
No comments:
Post a Comment