Summary:
We have now gone over the basics of masking, let’s take this tutorial and add on to your knowledge and learn more basic functions of Layer Masks. In this tutorial we will be showing you another way to copy from one image to another image. We will show you a quicker way to create a Layer Mask and how to disable/enable the Layer Mask. In the past, we have explained how to crop a full image and in today’s course we will show you how you can crop a layer. Finally the reveal all versus hide all will be explained.
If you are unfamiliar with certain areas that are not covered in this tutorial, feel free check out other tutorials on our website. We have many different types of tutorials that can be downloaded (Video, PDF) or viewed online that will train you for free! Once you have the knowledge, feel free to come back and go through this tutorial again.
You will be using 2 images in this tutorial (a picture of a sky and a Disney sign) If you do not have these images, please scroll down to the “Click Picture To Download Supporting Files” and download the images. Please open the image DSC03562 and PE-DISNEY in the Photoshop Program. **Even though every layer palette screen shot does not show it, we highly recommend that you always duplicate the background layer when you begin a project.
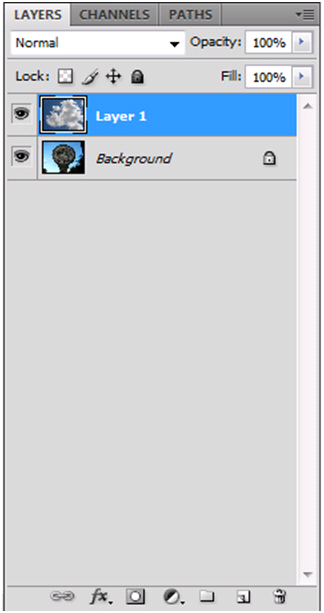
Before we begin, you will need to shrink the image size of the sky picture to a width of 1680. If you are unfamiliar how to shrink images, please review the Canvas Size, Cropping, Image Size tutorial. We have shown you how to copy from one image file to another image file, but here is even a quicker way to get both the sky photo and the sign image within the same file. Within the Sky image, use CTRL-“A” to select all and then use CTRL-“C” to copy. Now Left click on the sign image file tab and use CTRL-“V” to paste. Your layers should look like the following:

Sometimes it is easier to look at the layer below and determine what you would like to reveal then it is trying to guess what is underneath the layer. The following is an excellent trick to do layer masking! We would like to replace the current sky with the sky image and make it look like it was part of the image. Yes, the perspective will not be perfect and if you searched the web you could find a perfect perspective of a sky photo, but for now this example is to show you an easy way to mask.


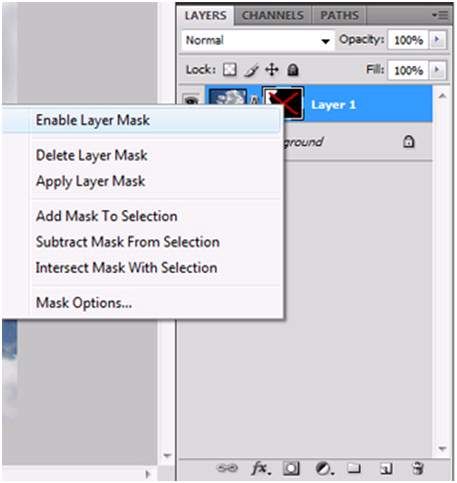
Sometimes you may want to see what the original looks like without the layer mask. You can disable the layer (does not delete it and will show you it unmasked).
| A). Right click the Layer Mask image box. | |
| B). Left click the Layer Mask. |


We have shown you how to crop a total image, now it is time to crop only the layer with a Layer Mask. **Close down both images (sky and Disney). Now open the sky image again. Duplicate the background layer (CTRL-“J”). Even though we did not duplicate the background layer above, we want you to get into a habit on duplicating the layer because you will always then have an original. Ok, create a new blank layer and move that layer in between the background layer and the sky photo. Finally, hide the background layer. Your layer palette should look like this (ignore the layer names, but pay attention to the order and that the background layer is hidden).


**Delete the current Layer Mask. If you need information how to delete the Layer Mask, please review the Masking And Transform Information tutorial. So what is the difference between the reveal all and hide all. Every time you have created a Layer Mask (including the previous tutorial), you have directly or indirectly did a Reveal All. This means it will start off the layer by showing you all the contents of the Layer and to mask you hide by using the black color. If you select Hide All, it will hide all of the image content and you would have to use a white color to unhide the image content. Most people will only use the reveal all!


Between the 2 tutorials on masking you should have more than enough knowledge to use the basics of masking. In this tutorial, you should of learned how to easily layer mask, what is a reveal all, how to disable a layer mask, how to crop a layer with layer mask and we showed you a quick trick to copy from one image to another image.

| A). Select the first image and use keyboard shortcuts, CTRL-“B”, CTRL-“C”, change to the target image and use CTRL-“V”. | |
| B). Select the first image and use keyboard shortcuts, CTRL-“C”, CTRL-“A”, change to the target image and use CTRL-“V”. | |
| C). Select the first image and use keyboard shortcuts, CTRL-“A”, CTRL-“C”, change to the target image and use CTRL-“V”. | |
| D). ). Select the first image and use keyboard shortcuts, CTRL-“V”, CTRL-“C”, change the to target image and use CTRL-“A”. |
| A). Right click the layer mask in the layer palette and Left click “Disregard Layer Mask”. | |
| B). Right click the layer mask in the layer palette and Left click “Disable Layer Mask”. | |
| C). Left click the layer mask in the layer palette and then click the “Disable Layer Mask” button. | |
| D). Left click the layer mask in the layer palette and Left click the “Disable Layer Mask” command. |
| A). Hold down the “Shift” key and Left click the icon. | |
| B). Hold down the CTRL key and Left click the icon. | |
| C). Drag the icon to the “Hide All” button. | |
| D). Hold down the ALT key and Left click the icon. |
| A). Make your selection and add a Layer Mask. | |
| B). From the “Edit” menu select “Crop” and then select “Only Layer”. | |
| C). Left click the Layer Mask and then Left click the “Crop” icon. | |
| D). You can only crop the complete image and not the layer. |
| A). Change the actual image size, so it is smaller in size. | |
| B). Duplicate the background layer and hide the background layer. | |
| C). You should always do your color corrections before using layer masks. | |
| D). When you open either a JPG or a GIF file, you should always make sure you have the layers in order from top to bottom. |
| A). It is the 3rd icon from the right hand side. | |
| B). It is the 2nd icon from the right hand side. | |
| C). It is the 2nd icon from the left hand side. | |
| D). It is the 3rd icon from the left hand side. |
| A). It means the complete layer image is hidden. | |
| B). It means the complete layer image is revealed. | |
| C). It means the layer mask is disabled. | |
| D). It means the layer mask is locked. |
| A). In the layers palette it will gray out the layer mask. | |
| B). From the “Layer” menu, the layer mask command will show “Disabled”. | |
| C). A red X will be in the layer mask image. | |
| D). The layer mask image will change to the word “Disabled”. |
| A). It will paint black on the image. | |
| B). It allows you to unhide that portion of the image. | |
| C). It allows you to hide that portion of the image. | |
| D). When you are done painting it in black, Left click the layer mask to apply the layer mask. |
| A). From the Layer menu, hover over masking and then select “Hide All” command. | |
| B). From the Layer menu, hover over layer mask and then select “Hide All” command. | |
| C). From the Layer menu, Left click the “Hide All” command. | |
| D). From the Layer menu, Left click “Masking” and then from the dialog box, Left click the “Hide All” command. |
Source: go
No comments:
Post a Comment