Wednesday, March 11, 2015

Photoshop tutorial-40{ layer blending mode guide on photoshop}

Photoshop tutorial-40{ layer blending mode guide on photoshop}
 Summary:
Layer blending modes are a key part of the Photoshop program. When you have more than 1 layer, than you can blend the layers together. The blending modes are broken into 6 main areas. 1). Basic, 2). Darken, 3). Lighten, 4). Contrast, 5). Comparative, and 6). Composite. Instead of this being a tutorial, this is going to be more of a reference guide. Keep our website as a favorite and refer back to this document whenever you are trying to blend layers.  Read more.....  
                                                                                                                                             

Photoshop tutorial-39{ use of sharpening comparison on photoshop}

Photoshop tutorial-39{ use of sharpening comparison on photoshop}
Summary:
We just finished another tutorial on sharpening in Photoshop. The sharpening techniques that we discussed covers all of the common sharpening methods inside Photoshop. When we are finished with the beginner and intermediate courses, we will come back and give you the advanced (uncommon) techniques. We thought it would be useful for you to see a comparison of the different sharpening methods.
 
Currently we are using Windows Vista Home Premium 64 Bit and the Photoshop CS4 Extended 64 Bit version.
 
Sharpening Information:
As you can see, there are no streaming video or downloadable files besides the PDF of this tutorial. The reason for this is because all of the sharpening methods that we will be comparing are already covered in the Basics Of Sharpening, Smartly Sharpen Your Images or the High Pass Sharpening tutorials.
 
To make this comparison fair, we took a portion of this crocodile and resized the image so that it would fit on our website. We then tired a single sharpening technique. We played with all of the settings to correctly sharpen that image using that specific technique. We closed and re-opened the same image for each test. We used the same monitor and computer to generate all the examples. We recorded the settings and we saved the images in the same file format and with the same file compression.
 
If you see a () next to the name, that is the settings we used.
 
It is important to understand that there will NOT be 1 tool in Photoshop that fixes all the different types of blurs of a specific image. Sometimes, you will need to fix a certain area with 1 technique and on a different layer fix another area with a different technique and either blend or layer mask the 2 layers.
 
Here are the results:
Original Sharpening
 
Sharpen Filter
 
Sharpen Edges
 
Sharpen More
 
Unsharp Mask
 
 Smart Sharpen
 
High Pass Sharpening
 
Multiple Sharpening Techniques
  Source: go

Photoshop tutorial-38{ use of high pass sharpening on photoshop}

Photoshop tutorial-38{ use of high pass sharpening on photoshop}
 Summary:
In this tutorial, we will be showing you the last sharpening technique and it is called the High Pass technique. High Pass filter is one of the obscure Photoshop filters that tries to determine the edges in an image. When you blend the High Pass layer with the original unsharpened image, you get a great looking image. Throughout this course we will show you different blend modes and give you tips and tricks to improving the image quality.
 
Currently we are using Windows Vista Home Premium 64 Bit and the Photoshop CS4 Extended 64 Bit version.
 
Knowledge You Need to Know:
If you are unfamiliar with certain areas that are not covered in this tutorial, feel free check out other tutorials on our website. We have many different types of tutorials that can be downloaded (Video, PDF) or viewed online that will train you for free! Once you have the knowledge, feel free to come back and go through this tutorial again.
 
Preparing For This Tutorial:
You will be using a picture of this colored crocodile. If you do not have this image (if you have a black and white image of the crocodile, that will NOT work for this tutorial), please scroll down to the image of “Click Picture To Download Supporting Files” and download the image. Please open the image PE-CRO1 in the Photoshop Program.
 
Final Sharpening:
There are a lot more sharpening techniques in the Photoshop bag of tricks, but either they are too advanced for a beginner/intermediate Photoshop user or they are hybrids of existing sharpening techniques that we already discussed. Between the Sharpen, Sharpen Edges, Sharpen More, Smart Sharpen, Unsharp Mask, and today’s tutorial on the High Pass Sharpening, you will be able to sharpen most blurred images.
 
In the future (after we get through the beginner tutorials), we will revisit sharpening again and teach you a few more techniques. For now, if you understand the 6 different sharpening techniques, you will be able to make most images look awesome.
 
High Pass Sharpening:
So what is a High Pass filter? The main goal of this filter is to determine the edges of an object. The first step for this tutorial is you MUST duplicate the background layer. If you do not do this step, you will ruin your original image (do not worry, you can always undo if you forget this step).
 
Now make sure your top layer is selected. In this tutorial, we named the layer “High Pass”.
Duplicate Layer
 
Left click the “Filter” menu and move your mouse pointer down to the “Other” option. From the sub-menu, Left click the “High Pass…” filter.
High Pass Filter Menu
 
First, do not get worried when you see the preview below. Remember we are working on another layer than the original. What you are seeing in the preview is Photoshop trying to determine the edges of the objects.
  A). If you are satisfied with the changes, Left click the “OK” button. If you want to disregard the changes, than Left click the “Cancel” button.
  B). Make sure the “Preview” button has a check in it. This way you will see the changes in the actual image as you adjust the radius setting.
  C). Left click the “-“ to zoom out of the preview. Left click the “+” button to zoom into the preview.
 
Photoshop Tip – For the High Pass sharpening technique, it is easier to look at the actual image, than the preview window.
High Pass Dialog Box
 
Here are the rest of the options of the High Pass filter dialog box.
  A). Move the mouse pointer to the preview box. Hold down the Left mouse button and drag the mouse. Release the Left mouse button when you are satisfied with the new position. Photoshop Tip – To jump to a specific location of the image, Left click the actual image. You will notice that the preview box will position to that specific spot.
  B). The High Pass filter tries to determine the edges. Anything gray will NOT be sharpened. Once it determines the edges, the Radius setting sets how far beyond that location it will try to sharpen. Move the mouse pointer to the up arrow for the slider bar and HOLD down the Left mouse button and drag the slider left or right.
  C). If you know the numeric value for the Radius, Left click the text box and enter the value. For this tutorial, set the radius at 4.2. The common radius is from 1.0 to 5.0.
 
Left click “OK” to apply the changes.
High Pass Filter Dialog Box
 
Your top layer should now look like the following image. Remember, you still have a copy of the original layer!
High Pass Filter Layer
 
Understanding Blending Modes:
Back in the Smudge, Sharpen, Blur Tools tutorial, we explained that we will be explaining modes in the future. Modes are blending modes. What is a blending mode? When you have more than 1 layer, you can add a blending mode. It tells Photoshop what type of information should bleed through from the layer below.
 
There are many blending modes to Photoshop and in a tutorial coming very soon; we will show you what each blending mode does! For now, we will be showing you 5 different blending modes. In this future tutorial, we will be explaining the details of each blending mode. For now, it is important for you to understand which blending modes will give you the best results.
 
Blending Modes:
Here is the true magic for the High Pass Filter.
  A). In the Layers palette, you will see a drop down box above the word “Lock”. Left click this drop down box to display all the blending modes.
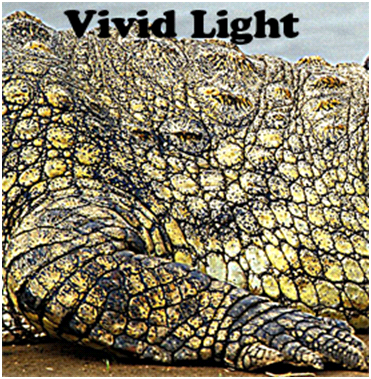
  B). For this tutorial, Left click the Overlay blending mode. Other sharpening blending modes are Soft Light, Hard Light, Vivid Light, and Linear Light. **Please note, there will be more blending modes above this section.
Blending Modes
 
Because we shrunk down the image, the true sharpening is harder to see, but you can tell there is a difference. Remember, the key to making it sharp is the radius option in the High Pass Filter (that determines the edges) and the blending modes. If you want to make it stronger without going back into the High Pass Filter, try the blending mode of “Hard Light”. Here is the “Overlay” blending mode compared to the original.
High Pass Compare
 
Blending Modes Comparison:
Here is a quick comparison on the blending modes.
Original
 
image
 
Soft Light
 
Hard Light
 
Vivid Light
 
Linear Light
 
Reducing Sharpness:
Sometimes after you used the High Pass Filter, you realize that the sharpness is to strong. Instead of starting over, you can just change the opacity on the layer. By changing the opacity, it will reduce the sharpness of that blending mode.
 
Make sure the High Pass layer is selected in the Layers palette and Left click inside the text box for opacity. To show a dramatic reduction in sharpness, enter a value of 20.
Opacity Correction
 
Tips And Tricks:
We have given you many tips and tricks in the last few tutorials on sharpening. Here are a few more new tips to make your image look awesome.
 
We usually will over sharpen the image in the High Pass Filter and then use the opacity trick that we explained on the previous page. Why not fix it exactly right the first time? You can always decrease the sharpness with the opacity, but because you can’t increase the opacity more than 100%, you are stuck with that sharpness. Always go over a bit with the High Pass Filter and reduce if needed.
 
Each blending mode will give you different results. Because it is easy to change the blending mode, we recommend that you try all 5 blending modes. Most of the time the Overlay blending mode will give you good results. The Soft Light blending mode will reduce the sharpness and the Hard Light blending mode will increase the sharpness.
 
Yes, we know this is not a new trick, but it is important to repeat. There is NOT one sharpening technique in Photoshop that will make all different types of blurs look great. It is important that you try different techniques. If you find a specific technique works well with a certain area, than have multiple layers and just use a layer mask to remove portions of sharpening from that layer so it bleeds through to the other sharpened layer below.
 
Sometimes after you applied the sharpening, you can’t tell a difference. We recommend that you use the history palette and go back to the open state of the image and look at the original compared to the modified. You can jump to different steps using the history palette. Please refer to the All About The History Palette for more information about the history palette.
 
When comparing the changes, try using the magnifying glass (see Zoom And Panning tutorial) and zoom into a specific area of the image. This will allow you to see the exact sharpening the technique did to the image.
 
Conclusion:
In the last few tutorials, we showed you all of the beginner/intermediate sharpening techniques. In this tutorial, we showed you how to sharpen your image with the High Pass filter. We also exposed you to a few blending modes. We will be having a full tutorial on all blending modes shortly.
 
You should know by now that you should over sharpen your image with the High Pass Filter and then reduce the sharpness using the Opacity option in the layers palette.
 
Please take a few minutes and take the 10 question quiz below to determine how much knowledge you have learned from this course.
 
10 Question Quiz
 
1). The High Pass Filter is located in what sub-menu in the Filter menu?
  A). Sharpen.
  B). Miscellaneous.
  C). Other.
  D). Correction.
2). What is the first step after you open the image to begin using the High Pass Filter technique?
  A). Duplicate the background layer and hide the background layer and create a mask in between the layers.
  B). Duplicate the background layer and select the top layer.
  C). Change the blending mode type to “Overlay”.
  D). Create a Layer Mask and correct the image.
3). When you use the blending mode “Hard Light”, does what?
  A). It usually makes the sharpening stronger.
  B). It usually makes the sharpening weaker.
  C). It creates a beam of light from a specific angle, such as from the sky.
  D). It usually does nothing to sharpening.
4). Name 3 of the 5 common blending modes that is used with the High Pass Filter?
  A). Lighten, Overlay, Hard Light.
  B). Overlay, Hard Light, Normal.
  C). Soft Light, Lighter Color, Overlay.
  D). Soft Light, Hard Light, Overlay.
5). What option in the Layers palette do you use to decrease the sharpening after you applied the blend mode and the
High Pass Filter?
  A). Opacity.
  B). Blend Reduction.
  C). Lighten Blend.
  D). Blend Correction.
6). When using the High Pass Filter, we recommended what?
  A). Start with lower settings and work your up and find the perfect setting.
  B). Increase the settings a little bit over what you feel is right and then use the option from #5 question and decrease the value.
  C). That you never start with a duplicated layer.
  D). That the blend mode MUST be changed before you use the High Pass Filter.
7). When you are in the dialog box of the High Pass filter, what does the standard gray mean in the preview box?
  A). It means those areas will be sharpened.
  B). It means that the image in those areas will automatically be set to the correct blend mode
  C). It means those area will not be sharpened.
  D). By default it shows gray, but we recommended that you turn on the “Preview” option to view the changes in color, so you can see High Pass Filter as color.
8). What is the common radius range we recommended in the High Pass Filter dialog box?
  A). 1.0 to 8.0.
  B). 2.0 to 20.0.
  C). 1.0 to 50.0.
  D). 1.0 to 5.0.
9). How do you jump to a specific spot of the image in the preview box in the High Pass Filter?
  A). Left click the actual image area (not preview) and the preview will jump to that specific spot.
  B). The only way to jump to that spot is by moving the mouse pointer to the preview box and holding down the Left mouse button and dragging it to that spot. Release the Left mouse button to make the jump.
  C). Left click the “Goto” button and enter the image coordinates that you want to jump to in the preview dialog box.
  D). Use the slider bars to adjust the position to jump to a specific spot quickly.
10). What does the High Pass Filter do?
  A). It tries to determine the engraved spots of the image.
  B). It tries to increase the brightness of the image.
  C). It tries to locate the edges.
  D). It tries to increase the density and the weakness of the pixel size.
 
Answers: 1). C, 2). B, 3). A, 4). D, 5). A, 6). B, 7). C, 8). D, 9). A, 10). C
Source: go

Photoshop tutorial-37{ use of smartly sharpen your images on photoshop}

Photoshop tutorial-37{ use of smartly sharpen your images on photoshop}


In this course we will show you how to use the Smart Sharpen filter. This technique of sharpening gives you more options than some of the other sharpening techniques. Some of the options are to correct Motion blur, Lens blur, and Gaussian blur. We will show you how to use the advanced options within the Smart Sharpen filter. These options will allow you to decrease sharpening for shadows or highlights only. Throughout this course, we will give you tips and tricks on how to sharpen your image to make it look perfect.
 
Currently we are using Windows Vista Home Premium 64 Bit and the Photoshop CS4 Extended 64 Bit version.
 
Knowledge You Need to Know:
If you are unfamiliar with certain areas that are not covered in this tutorial, feel free check out other tutorials on our website. We have many different types of tutorials that can be downloaded (Video, PDF) or viewed online that will train you for free! Once you have the knowledge, feel free to come back and go through this tutorial again.
 
Preparing For This Tutorial:
You will be using a picture of a crocodile. If you do not have this image, please scroll down to the image of “Click Picture To Download Supporting Files” and download the image. Please open the image PE-CROC in the Photoshop Program.
 
Sharpening Information:
In our previous tutorial Basics Of Sharpening, we went over some of the sharpen tools in Photoshop and now it is time to expand on your knowledge with the Smart Sharpen filter. As we said in the previous tutorial, these sharpen techniques will improve your image, but will not correct (it helps) extreme out of focus or very strong motion blurred images. It will also not help that much if the motion blur has multiple directions (sometimes you can move the camera to the right and left when taking the picture). If the image is a bit out of focus, these techniques will do wonders to the quality of your image.
 
Remember, we stated in the last tutorial that there are many ways to sharpen in Photoshop and there is NOT one way that is perfect for each image. We are not here to say which technique is the best, but we are here to show you how you can use each technique.
 
How To Use The Image:
This crocodile is split into 3 sections. Once you have it open, please refer to the image below to determine what type of blur is in each section. Normally, you will only have 1 type of blur to an image.
 
On the right hand side, you will see a motion blur. This is common when you move the camera when taking a picture. Lens blur which is located in the center portion of the image is when the digital camera is not perfectly in focus a portion of the image. The Gaussian blur is when the image has a softer blur and is blurred across the whole image. This usually happens with scanning slides or pictures.
 
For this tutorial, we will be fixing each section separately. These images are smaller for the website. This means that it will be harder to see the true changes. Yes, when you shrink an image, you are losing quality, but because it is smaller, and it still looks good at the smaller size. To help show you the differences, we will be over sharpening the image.
 
You should only sharpen when you are done editing the image and the image is scaled, enhanced and on 1 layer. When you are posting an image to the web or if you are changing the image size smaller, stick with a smaller radius for the settings.
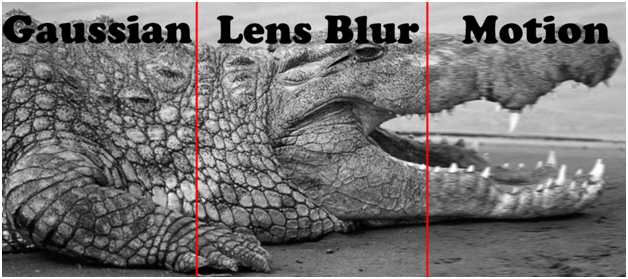
Gaussian, Lens, Motion
 
Smart Sharpen (Gaussian Blur):
We will be fixing the Gaussian Blur first. **Please use the Rectangular Marquee selection tool and make a selection around the first box. To fix Gaussian blur, Lens Blur, or Motion blur, Left click on the “Filter” menu and then move your cursor down to “Sharpen”. Left click the “Smart Sharpen…” command in the submenu.
Smart Sharpen Filter Menu
 
Let’s go over the first few options in the Smart Sharpen dialog box.
  A). If you want to apply the changes, Left click “OK” and to disregard the changes, Left click the “Cancel” button.
  B). Make sure the “Preview” box is checked so you can see the changes on the image as you make the adjustments.
  C). For this section, make sure the “Basic” radio box is checked.
  D). To move the preview image, HOLD down the Left mouse button and drag it. Release the Left mouse button when you are happy with the preview. Photoshop Tip – If you want to see the original in the preview area, HOLD down the Left mouse button (no need to drag the mouse) and you will see the original. Release the Left mouse button.
 
Photoshop Tip – Move your mouse to the actual image and Left click on an area and the preview in the Smart Sharpen dialog box will position it to that location.
Basics Of Smart Sharpen
 
Here are a few more options for the Smart Sharpen dialog box.
  A). Use the minus button to zoom out and plus to zoom in to the preview image.
  B). When you are done saving it with C). you will see the settings in this drop down box.
  C). For this tutorial, Left click the folder image to save the settings (does not matter what settings you have, it is just an example of how to save and delete).
Basics Of Smart Sharpen
 
You will then see the following dialog box.
  A). Left click the text box and enter a name for the settings. You will find some settings usually will work for your images. Name it, something that you will remember in the future.
  B). Left click “OK” to follow along with this tutorial or you can Left click “Cancel” if you want to disregard saving the settings.
Smart Sharpen Save Settings
 
Now you will see in the name in the settings dialog box. Use the trashcan image to the right of the folder to delete your setting.
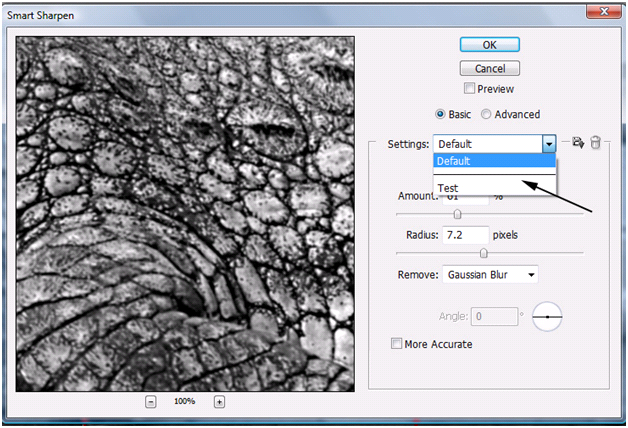
Smart Sharpen Settings
 
The following options are the same for all 3 different types of blurs. For A). & B). move you cursor to the up arrow in the slider bar and hold down the Left mouse button and drag the mouse left or right. Release the Left mouse button when you are happy with the changes.
 
You will notice it looks similar to the dialog box of unsharp mask (that is why we did a tutorial on unsharp mask first). Check out the Basics Of Sharpening tutorial.
  A). The Amount is the amount of contrast you want added to the edge.
  B). The Radius is how much you want to increase the size of the edges.
  C). You can enter the values in these text boxes (Left click the text box) if you know the values. **For this tutorial, enter 61 for amount and 7.2 for radius.
  D). This is where smart sharpen and unsharp mask are different. Left click this drop down menu and you will see 3 choices 1). Gaussian Blur, 2). Lens Blur, 3). Motion Blur. **For this tutorial, make sure the remove is set to Gaussian Blur.
Gaussian Blur Settings
 
Gaussian Blur is when the image is softly blurred across the whole image. When you where using Unsharp Mask, it was using the algorithm for this Gaussian Blur. The difference between Unsharp Mask is that the Unsharp Mask gives you a threshold slider bar. That is ok because we recommended that you keep it always set to 0 and when we get into the advanced section of the Smart Sharpen filter, you will find that you have more flexibility than the threshold value in the Unsharp Mask.
 
Here is some more information about the Smart Sharpen dialog box. Just so you are aware, the basic screen is the same to remove Gaussian Blur, Lens Blur, and Motion Blur (well you have 1 extra field when you remove motion blur and we will be explaining that shortly in the tutorial).
 
So what is “More Accurate” check box? When turned on. it over exaggerates the sharpening. Most of the time you will leave this turned off, because it sharpens it too much. Compare the previous preview to the preview image below and you will see the difference.
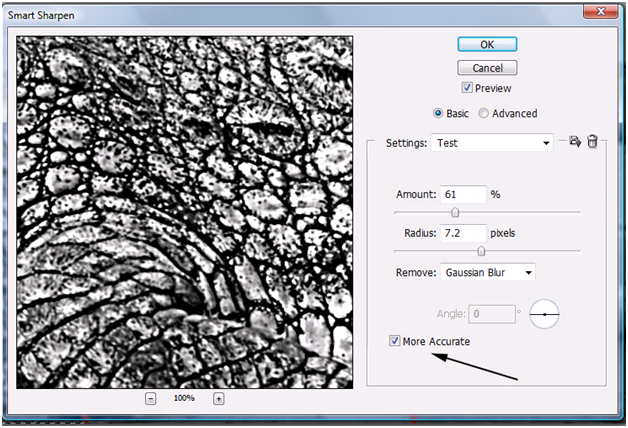
Smart Sharpen More Accurate
 
Let’s look at the before and after. Yes, we sharpened it a bit too much, but because we are scaling this down for the tutorial, we wanted you to see the difference. To get a very good looking image, play around with the radius.
Before And After Gaussian
 
Smart Sharpen (Motion Blur):
So the left side portion of the image is done. Let’s go to the far right side and show you how to adjust the motion blur. Make a selection around the right box of the image and get back into the Smart Sharpen filter. Motion blur happens when an object is moving or if you move the camera when you are taking the picture or also when the shutter is open to long. If your image is blurred in different directions, try fixing one direction first and repeating the process for the second direction.
  A). First select Motion Blur from the drop down box for Remove.
  B). Look at the blur angle and see what direction the blur is. For this tutorial, leave it as a 0 angle. To change, Left click the text box and enter a value. For this tutorial, use 500% for the amount and 9.0 for the radius.
  C). To rotate the angle, move the mouse pointer to the circle with the line. Now hold down the Left mouse button and drag it in a circle. Release the Left mouse button when you are happy with the changes.
**Motion blur fixing is A LOT of trial and error. Keep playing with it!
Motion Blur Correction
 
As you can see it did a good job at removing the Motion blur. Once again, play around with the settings for the angle, radius, and amount and you will get even better results.
Before And After Motion
 
Smart Sharpen (Lens Blur):
When a camera is out of focus, it creates a Lens Blur. If you took the picture with a digital camera and you know it is not motion blur, than try Lens Blur removal. Make a selection around the center box. Now get back into the smart sharpen filter. For this tutorial, change the amount to 86% and the radius to 3.6 pixels.
  A). Left click this drop down box and Left click the Lens Blur.
Smart Sharpen Lens Blur
 
Here is the before and after images.
Before And After Lens Blur
 
Smart Sharpen (Advanced Settings):
**Before proceeding, use CTRL-“D” to deselect. In this next section, we will be adjusting the whole image. For Gaussian Blur, Motion Blur, and the Lens Blur, you can Left click on the Advanced radio button to show the “Sharpen”, “Shadow”, and the “Highlight” tabs.
 
Usually this part of the tutorial, we tell you that if a portion of your image needs to be corrected only, than make a selection around that specific area or we would tell you to adjust the whole image and then mask that layer to reveal the unsharpened layer below. The smart sharpen advance options allows you tell Photoshop what areas that you DO NOT want to sharpen as much.
 
So in the first screen (sharpen tab), you are telling Photoshop the sharpening settings for the whole image. In the advanced tabs you are telling it what areas you want to make it less sharp (not more sharp). As we discussed in the Straight To Curves tutorial, the shadows are your darker areas of the image and your highlights are your lighter areas of the image.
 
When you are making adjustments to the Shadows or Highlights tab, you are fine tuning those specific areas only. These adjustments are small adjustments, but can make the difference between a great sharpen versus an awesome sharpen.
 
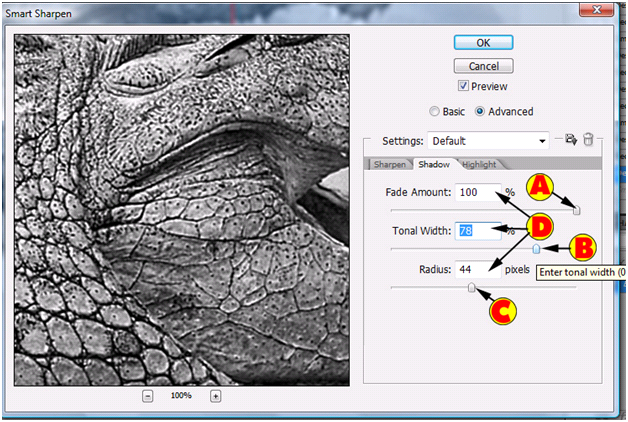
On this example, get back into the smart sharpen filter and change it to Lens blur and 60% for the amount and 2.0 radius. Left click the Advanced radio button to display the 3 tabs. Left click the “Shadow” tab. Remember, in the Sharpen tab, you are telling Photoshop to sharpen the whole image and in the Shadow/Highlight tab you are telling Photoshop what areas you do not want to sharpen or at least sharpen as much.
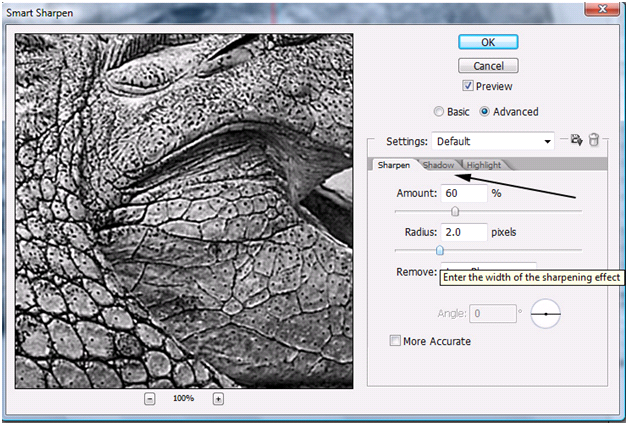
Advanced Tabs
 
Let’s look at these options. For all slider bars, move your pointer to the up arrow and hold down the Left mouse button and drag the mouse left or right. Release the Left mouse button, when you are happy with the changes.
  A). The Fade Amount controls the strength of the sharpening in either areas that are considered shadows or highlights. If you increase this amount in the shadows tab, then the dark areas of your image will not be as sharp.
  B ). The Tonal Width controls which tonal values will be affected by the reduction in sharpness. It tries to determine the difference between the lightest part of the image and the darkest part of the image.
  C). The Radius determines which areas are to be considered shadows or highlights. It controls the size of the area around each pixel to determine whether it is a shadow or highlight.
  D). Left click the text boxes to change the values. For this tutorial, enter fade amount of 100% and Tonal Width of 78% and Radius of 44 pixels. We really do not want to reduce the sharpening on this image and that is why the values are so high.
Advanced Shadow Tab
 
Play around with the settings. Remember you are fine tuning the darks and lighter areas of the image. In a normal sharpening, you would not apply the changes (Left click OK) and get back into filter. You would normally do the sharpening and un-sharpening one time. Go ahead and Left click the “Highlight” tab and give it a try yourself. Play around with the settings.
 
Here is the before and after images after we made all the adjustments. **Please note, we over sharpened it for the tutorial, to allow you to see the changes in the written document and video. Normally you would have the settings a bit lower. You can see also that if we wanted to make this image look perfect, we should have corrected the Motion blur section a little bit more.
 
To make it look better, read the tips and tricks section below.
Before And After Final
 
Tips And Tricks:
When you shrink an image, you lose quality. Even though it is harder to see when it is smaller, trust us, shrinking will cause the image to lose quality. So here iare some steps to make your image look the best at any size. Make all your modifications and then reduce the size of the image and then use the adjustment layers such as curves, levels, etc. Now sharpen your image.
 
When printing, an image, you will find what you see on the monitor is not what you get when it is printed out. First, make sure in your printer settings you have the correct paper type selected. Most printers will allow you to change the option if you are printing on regular paper versus glossy paper, or even if it is a photo instead of text. You will usually find that you will need to over sharpen on the screen to make your printed images look perfect. We will keep a copy of the file as the print version and the regular version that will not be printed (looks great on the monitor). When playing with the settings for print, try to keep the radius option set to a lower setting.
 
Remember, not 1 sharpening tool is the best (yes, some sites say that certain tools are better than others) and most of the time you will need to play around with each sharpening tool to see which one works. You can also stack sharpening tools. Any of the sharpening tools will make the changes to that layer only. This means you can use any of the sharpening tools on a layer and then mask out the certain areas that you want it to bleed through and use a different technique for the layer below.
 
It is always easier to crank up the settings and gradually reduce the sharpening, than it is to start with a lower setting. As you lower the settings, you will find which setting looks the best.
 
Make a test sheet. This is done by going in and copying a small portion of that image to a new file. Now use a specific technique and then save it. Usually we name the file with the sharpen type and the settings. So let’s say we were testing the smart sharpen with lens blur and the amount was 60 and radius set to a 2, than our test file name would be: TEST_SS_LB_60_2. First is the file name and then SS stands for smart sharpen and LB is Lens blur and then the settings. Now either merge all the files into 1 image or open all the different images and compare. Find the best image and if it looks perfect, than just use those settings on the whole image. If you find portions of other sharpening tools look better in certain areas, than just mask out those specific areas and apply the other sharpening technique to the layer below.
 
Conclusion:
The next tutorial, we will be talking about the High Pass sharpen technique. Once we are done with that tutorial, we will create a sheet with all the different sharpening techniques.
 
By now you should understand the basic options in the smart sharpen filter. We also showed you how you can decrease the sharpening in certain areas of the image by using the advanced options for the shadow/highlight tab.
 
We are on our 40th tutorial, so expect a pop quiz coming soon! Take some time and review tutorials 31-40. Remember pop quizzes have a bit tougher questions and have more questions per quiz. Please take a few minutes and answer the 10 question quiz below.
 
Remember if you do not know what type of blur it is, try the remove Lens blur option first.
10 Question Quiz
 
1). What does the “More Accurate” option usually do in the Smart Sharpen filter?
  A). It takes you to a dialog box which will allow you to select the specific areas to sharpen.
  B). It allows you to decrease the sharpness of the shadow areas.
  C). It allows you to decrease the sharpness of the highlight areas.
  D). It will usually over exaggerate the sharpening.
2). If you had 2 directions that a Motion blur was coming from, what did we recommend that you try?
  A). Use the remove for Gaussian blur first and then use the Motion Blur removal.
  B). Use the Motion blur option to correct the first blur and then repeat the steps to try to remove the second motion blur.
  C). Use the Motion blur option and instead of finding the correct angle, try an angle that is in between both motion blurs.
  D). Use the Motion blur option with double the settings for the radius and amount.
3). When you select the Advanced radio button in the Smart Sharpen dialog box, what 3 tabs will be displayed?
  A). Midtones, Shadow, Highlight.
  B). Smart Sharpen, Shadow, Highlight.
  C). Sharpen, Shadow, Highlight.
  D). Advanced, Shadow, Highlight.
4). What are you telling Photoshop to do, when you select the shadow option in the Smart Sharpen filter?
  A). It tells Photoshop what dark areas you do NOT want to sharpen.
  B). It tells Photoshop what light areas you do NOT want to sharpen.
  C). It tells Photoshop what dark areas you want to sharpen more.
  D). It tells Photoshop what light areas you want to sharpen more.
5). What is a Gaussian Blur?
  A). It is when you see a streak for a blur.
  B). It is when only a portion of the image is out of focus and happens always with digital cameras.
  C). It is a hard blur over a portion of the image.
  D). It is a softer blur over the whole image.
6). What happens when you shrink the image size?
  A). The image size is reduced and the quality is reduced.
  B). The image size is reduced and the quality is enhanced.
  C). The image size is reduced and there is no quality difference.
  D). The image size is reduced and the file size triples.
7). What is the Tonal Width do in the advanced section of the Smart Sharpen filter?
  A). The Tonal Width measures the pixel size of the sharpness.
  B). The Tonal Width controls which tonal values will sharpened and the size of the pixel will be increased.
  C). The Tonal Width controls which tonal values will be affected by the reduction in sharpness.
  D). The Tonal Width allows you to select a color slider bar and allows you to pick the starting and ending color.
8). What do you do to see the original (non-modified) image in the preview box of the Smart Sharpen filter?
  A). Left click the “Original” button.
  B). You only can see the original by turning off the “Preview” option.
  C). Drag the preview box to the “Comparison” button and it will show you a side by side comparison (original versus sharpened).
  D). Hold down the Left mouse button in the preview box to see the original and release the Left mouse button when you want to see the sharpened preview.
9). What should you do if you do not know what type of blur it is?
  A). In the Smart Sharpen filter, always try the remove Gaussian blur first.
  B). In the Smart Sharpen filter, always try the remove Lens blur first.
  C). In the Smart Sharpen filter, always try the remove Motion blur first.
  D). In the Smart Sharpen filter, always use the “Auto” button and it will switch to the correct type of blur.
10). We recommended that to find a perfect setting, it is usually better to?
  A). Start with lower settings and gradually increase the settings.
  B). Always start with the radius setting very high, but the amount setting very low.
  C). Always start with the amount setting very high, but the radius setting very low.
  D). Start with all higher settings and gradually decrease the settings.
 
Answers: 1). D, 2). B, 3). C, 4). A, 5). D, 6). A, 7). C, 8). D, 9). B, 10). D
Source: go
Photoshop tutorial-36{ use of Bacics of Sharpening on photoshop}

Photoshop tutorial-36{ use of Bacics of Sharpening on photoshop}
Basics Of Sharpening Summary:
In this tutorial we will be discussing the first 4 sharpening techniques (sharpen, sharpen edges, sharpen more and unsharp mask) in Photoshop. We will show you the advantages and disadvantages of each technique. Each technique will be explained in detail on what it does and its limitations. Along the way, we will give you tips and tricks such as how to partially sharpen an image. Don’t worry if these 4 different techniques do not sharpen your image perfectly because we will be having more sharpening tutorials in the next few courses.
 
Currently we are using Windows Vista Home Premium 64 Bit and the Photoshop CS4 Extended 64 Bit version.
 
Knowledge You Need to Know:
If you are unfamiliar with certain areas that are not covered in this tutorial, feel free check out other tutorials on our website. We have many different types of tutorials that can be downloaded (Video, PDF) or viewed online that will train you for free! Once you have the knowledge, feel free to come back and go through this tutorial again.
 
Preparing For This Tutorial:
You will be using a picture of text. If you do not have this image, please scroll down to the image of “Click Picture To Download Supporting Files” and download the image. Please open the image PE-SHARPENEXAMPLE in the Photoshop program and duplicate the background layer.
 
Before We Begin:
We just finished most of the adjustment tutorials, which will correct colors, brightness/contrast, etc. Now that you understand how to create adjustment layers, we felt it was important to show you how sharpen an image.
 
As you may notice, we did not cover ALL of the adjustments, but for now you have more than enough adjustment knowledge to enhance your image.
 
Image Sharpening:
There are many ways to sharpen an image in Photoshop and each way has its advantages and disadvantages. If you search on the web for the best sharpening methods in Photoshop, you will find everyone will have their own opinion. Some will say unsharp mask or smart sharpen while others may say the high pass method. The problem is some methods work excellent with a specific sharpening area, while other areas of the image it actually looks worse. Where NOT here to tell you what method is the best, but we are here to show you the common basic sharpening techniques. We will let you decide which method works for your specific image. The only recommendation we will give is we find better results when a tool allows you to manually adjust the settings.
 
Basics Of Blurred Images And Sharpening:
Before we begin, it is important to understand that a very blurred image will NOT look perfect even if you tweak or adjust and use all the tools in Photoshop. You can fix images that were taken a bit out of focus and make them look perfect, but don’t expect miracles if the image has motion blur (there are tools to help motion blur) or extremely out of focus. Now that we have given you a bit of a disclaimer, let’s proceed and explain how Photoshop sharpens an image.
 
How does Photoshop sharpen an image? Because we are a basic/intermediate Photoshop tutorial site, we are not going to get to technical. Each tool will try to find the out of focus areas (different methods) and increase the contrast in those specific areas. By increasing the contrast (darkens the dark areas and lightens the lighter areas of similar pixels) it will sharpen the image.
 
Technique #1 (Sharpen):
The first tool we will be talking about is the Sharpen Filter. This tool dates back many years in the Photoshop program and when you use this tool it increases the contrast between the pixels. It finds the dark shades and the lighter shades in the image and darkens the darker shades and lightens the lighter shades. This creates a stronger contrast.
 
This tool does not give you any options and you can’t manually adjust the settings. For us, we would rather use a tool that we can adjust the settings.
 
For this tutorial, we recommend that you follow along with us and do each step while we proceed through this course When you shrink pictures to fit a web page, indirectly the quality of the image looks better. This means, it will be tougher to only read this tutorial and see all the changes it truly made.
 
**Please make sure you have opened the image and duplicated the background layer. This will allow you to see the subtle changes of the sharpening methods.
 
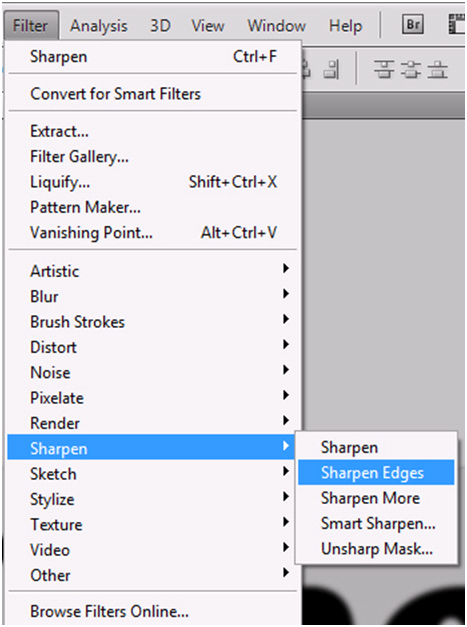
To get to the first sharpen technique, Left click the “Filter” menu and move the mouse pointer down to the “Sharpen” menu. Move the mouse pointer to the sub-menu and Left click on the “Sharpen…” command.
Sharpen Filter
 
You will notice that it makes very subtle changes in sharpening. A). is the original image, B). is the image using the sharpen filter.
Before After Sharpen Filter
 
So how can you make it look better? A great keyboard shortcut in Photoshop is CTRL-“F”. This uses the last filter used. Instead of going into the Filter, Sharpen, Sharpen command to run this again, use the CTRL-“F”. Use CTRL-“F” 2 times for this tutorial. Let’s now look at the changes. Remember A). is the original and B). is the sharpen filter and after 3 times (1 time manually and 2 times with the keyboard shortcut) it looks better.
 
You will notice it did a good job at sharpening the image. Once again the disadvantage is you can’t manually adjust the settings.
Sharpen Multiple Times
 
Technique #2 (Sharpen Edges):
**Close and re-open the image or use the history palette, so the image is blurred again.
 
The next sharpen technique is the sharpen edges filter. The difference between the sharpen filter and the sharpen edges filter is that this filter looks for large amounts of contrast already in the image. Edges will have a high contrast. This is how Photoshop determines the edges of the image and tries to sharpen the image on the edges.
 
Left click the “Filter” menu and move the mouse pointer to the “Sharpen” menu and move to the submenu and Left click the “Sharpen Edges…” command.
Sharpen Edges
 
The part you want to look at is the edges. You will notice a subtle change on the edges. The A). is the original and B). is the filter with sharpen edges applied.
Sharpen Edges Before After
 
Let’s apply this sharpen edges 3 more times (total of 4). Use the CTRL-“F” 3 times. You will notice an improvement over the original.
Sharpen Edges More
 
Technique #3 (Sharpen More):
**Close and re-open the image or use the history palette, so the image is blurred again.
 
The sharpen more filter is silly because it is the sharpen filter but increased settings. You still can’t change any of the settings. If you used the CTRL-“F” to repeat the regular sharpen filter, you would be using the sharpen more filter.
 
To use, Left click the “Filter” menu and move the mouse pointer to the “Sharpen” menu and then Left click the “Sharpen More…” command in the submenu.
Sharpen More Filter
 
Technique #4 (Unsharp Mask):
**Close and re-open the image or use the history palette, so the image is blurred again.
 
The final technique for this tutorial is one of the better sharpening tools in Photoshop. Some will debate that it is the best sharpening tool while others will name other sharpening tools. You may be thinking, but I do NOT want to Unsharp anything or else it will make it worse. Just trust us that it will make the image look better.
 
To use this tool, Left click on the “Filter” menu and move the mouse pointer down to the “Sharpen” menu. Now Left click the “Unsharp Mask…” in the submenu.
Unsharp Mask
 
Here are some of the settings in the Unsharp Mask dialog box.
  A). Left click “OK” to apply and “Cancel” to disregard the changes.
  B). Make sure the “Preview” option has a check in the box, so you can see the changes in the image as you make the adjustments.
  C). Move your mouse pointer to this preview section. To move the image, HOLD down the Left mouse button and drag the mouse. Now release the Left mouse button. Photoshop Tip – If you want to see what the original looked like, HOLD down the Left mouse button (no need to move the mouse) and it will display the original. Release the Left mouse button when you would like to view it modified again.
  D). Left click either the “-“ or “+” to zoom in and out.
Unsharp Mask Options
 
Let’s talk about the rest of the options in this dialog box. For all slider bars, move your mouse pointer to the up arrow and HOLD down the Left mouse button and drag the mouse left or right. Release the Left mouse button when you are satisfied with the changes.
  A). The Amount is the amount of contrast you want added to the edge.
  B). The Radius is how much you want to increase the size of the edges.
  C). The Threshold is telling Photoshop how different the values of the brightness is before determining the edges.
  D). You can also enter a numeric value in these text boxes. Left click the box and enter, 500% for the amount, 0.9 pixels for the radius and 0 for the threshold for this tutorial.
Unsharp More Options
 
So how should you set each setting for your image? First, most of the times you do NOT want to touch the threshold. The radius range works well usually well between 0.3 and 3.0. For the amount field, you will need to play around with to get it right. For this tutorial we increased the amount to 500, but normally you would be in the 50-150 range.
 
Let’s look at the results of the unsharp mask filter. The left hand side A). is the original image and the right hand side of the image B). is using the unsharp mask. Because you have the flexibility to change the settings, you will see that it did an excellent job.
Before After Unsharp Mask
 
Sharpening Partial Image Only:
There are 2 common easy ways to sharpen only a portion of the image. 1). You can select the portion that you want to sharpen and use the filter while that portion is selected. Anything inside the selection will be sharpened. 2). Use a sharpen tool in Photoshop and then mask the areas you want to hide. This means you will need a copy of the blurred image below the sharpened image layer. Just create a mask on the sharpened layer and you can get some good results.
 
Here is a mask that we created to enhance a portion of this text in this tutorial. We used a black to white (left to right) gradient. This allows us to go from the original blurred image (left side) to a sharpened image (right side).
Sharpen Partial Image
 
Real Life Examples:
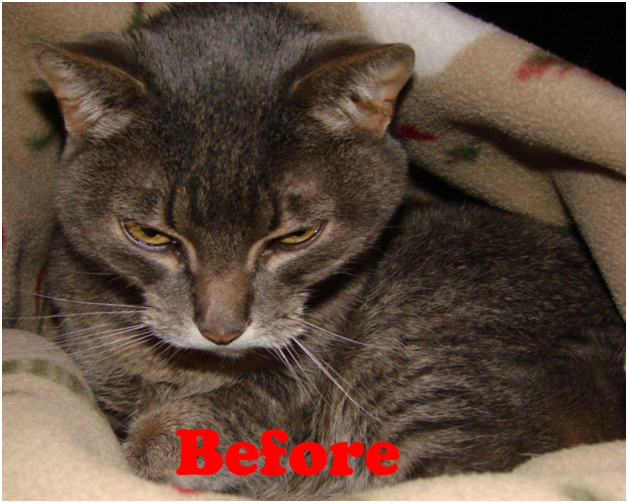
As you can see, we used text as the image. Here is some before and after images of our cat (Destiny). Notice the blur on top of the head and back of the cat.
Blurred Original Image
 
Here is the sharpened image that we did in Photoshop. If you compare the 2, you will see the difference. The first image was a bit out of focus and after we applied the sharpening (unsharp mask), it looks much better.
Sharpened Image
 
Even though we scaled this down (when you scale down an image it looks better), here is the comparison.
Sharpen Comparison
 
Tips And Tricks:
As we go through the next few tutorials, we will be talking about other techniques that allow you to sharpen an image. Remember, not 1 tool is perfect for a specific sharpening. Remember, we already discussed back in the Smudge, Sharpen, Blur Tools tutorial about the sharpening tool. We use that tool a lot to enhance a specific small area of a photo.
 
As you use the sharpen, sharpen edges or even unsharp mask, if you repeat the process or increase certain settings, it can cause you problems. You need to be VERY careful at watching the subtle changes in sharpening. Here is an example of using the sharpen edges 10 times. It did not take much to add too much sharpening.
Overused Sharpen
 
Remember if you have a picture with motion blur or extremely out of focus, Photoshop will NOT usually make those images look excellent. Sometimes you can make them look good, but not great.
 
As we stated in the sharpening partial image section, you can adjust only certain areas of the image. Sometimes, a specific sharpening technique works wonders in certain areas. What we do is make duplicate copies of the image. Select a specific layer and adjust it by using a certain technique and then mask out the areas that it did not improve. Than for the layer below it, we may use a different technique for the whole image and mask out certain areas and repeat the process. You will begin to learn what tools in Photoshop will fix certain areas. Once you understand how to correct these types of pictures, you just stack the layers and adjust only specific parts of the image with certain tools.
 
Always make a duplicate copy of the original picture when you are sharpening, because there are very subtle changes and it is common for us to compare the original full image to the sharpened layer.
 
When you are sharpening an image, you are sharpening ONLY that layer.
 
We will have a course in the future about how to process RAW images. A RAW image on a camera has not been enhanced by the camera. Camera’s usually do a good job at enhancing your image before it stores the file, but if you leave it as a RAW mode, you will get better results when sharpening or enhancing an image in Photoshop.
 
Conclusion:
In the next few tutorials, we will be showing you some more techniques or filters that can be used to sharpen your image. For now, you should have an understanding how to use the sharpen, sharpen edges, sharpen more, and unsharp mask filters in the Photoshop program.
 
We showed you that you can adjust only a specific area of the photo and gave you some tips and tricks to allow you enhance your image through sharpening.
 
We hope you enjoyed this tutorial on basic sharpening in Photoshop and we recommend that you take a few minutes and answer the 10 question quiz below.
 
10 Question Quiz
1). What is the keyboard shortcut to use the last Filter used in Photoshop?
  A). CTRL-“R”.
  B). CTRL-“U”.
  C). CTRL-“F”.
  D). CTRL-“L”.
2). All of the sharpen tools we discussed in this tutorial are located in what menu?
  A). Adjustment.
  B). Filter.
  C). Correction.
  D). Edit.
3). Name 1 easy way to sharpen a portion of the image?
  A). Use the sharpen technique and then add a layer mask to remove the portions you do not want to be sharpened.
  B). Right click on the sharpen tool and select “Partial Sharpen”.
  C). Make a selection around the area that you do not want to sharpen and apply the sharpen technique.
  D). Copy that portion to a new layer and then sharpen that specific portion of that layer and then reposition that layer so it correctly matches up with the other layer. This is easiest way to sharpen only a portion of the image.
4). Name one of the techniques that we showed you in this tutorial that allows you to adjust the sharpen settings?
  A). Sharpen.
  B). Sharpen More.
  C). Sharpen Edges.
  D). Unsharp Mask.
5). Which statement below is correct?
  A). It is always better to let the digital camera make the adjustments and then fine tune the adjustments, corrections in Photoshop.
  B). You should only use the “Sharpen Edge” tool in Photoshop to correct the out of focus images.
  C). Use different sharpen tools and try to save the image on the digital camera as a raw file so you can make all the adjustments in the Photoshop program.
  D). When sharpening, you should always begin with the “Auto” command in the sharpen filters menu.
6). What does the Amount do in the Unsharp Mask screen?
  A). It tells how much color you want to apply to the center of the sharpen.
  B). You are telling Photoshop how much contrast to apply.
  C). You are telling Photoshop how different the pixels should be before it makes the changes.
  D). It tells the program how much area you will be masking.
7). What does the Radius do in the Unsharp Mask screen?
  A). It tells Photoshop how big of an edge you would like to add.
  B). You are telling Photoshop how strong the contrast and brightness you want to apply to the overall image.
  C). It is only used to tell Photoshop the radius of the area that you will be masking (this is why the tool is called Unsharp Mask).
  D). It tells Photoshop to adjust only specific colored pixels.
8). In the Unsharp Mask preview box, what do you do to see the original unmodified image?
  A). Left click the “Original” button on the right hand side and it will display the original blurred image.
  B). Drag the preview image to the “Original” button to display the original blurred image.
  C). The only way to see the original is by turning off the “Preview” option in the dialog box.
  D). In the preview image, HOLD down the Left mouse button to display the original blurred image.
9). In the Unsharp Mask dialog box, what does the “-“ or “+” buttons do?
  A). It allows you to decrease or increase the sharpening of the image.
  B). It allows you to decrease or increase the contrast of the image.
  C). It allows you to zoom in and out of the preview.
  D). It allows you to decrease or increase the contrast and sharpening at the same time.
10). When you use the Sharpen Filter once, it usually does what?
  A). It usually will correct the edges of the image perfectly by adjusting the dark and lighter shades.
  B). It usually will correct non-edges perfectly.
  C). When applied you will usually see subtle changes to the edges only.
  D). When applied you will usually see subtle changes in the whole image.
 
Answers: 1). C, 2). B, 3). A, 4). D, 5). C, 6). B, 7). A, 8). D, 9). C, 10). D
Source: go